Car Wash Curtain Installation Guide
For custom wet-bay curtain projects, see car wash curtains.
Installing a car wash or wash bay curtain system looks straightforward on paper: hang curtain sections from a track, align them, done. But precision matters. A curtain system that’s 2 inches too short leaves water splash exposed to the adjacent area. A track that’s 1/4 inch out of level creates bind and rough sliding.
After 13+ years manufacturing curtains for car wash facilities, we’ve learned that installation quality determines whether your curtain works like a dream or becomes a maintenance headache.
Here’s our detailed 7-step installation process, the tools you’ll need, and the mistakes we see most often.
Step 1: Assess Your Bay (Measurement & Site Survey)
Before ordering curtains, you need to understand what you’re working with.
What to Check:
- Bay dimensions
- Width: Measure at top, middle, and bottom (check for squareness)
- Height: Measure from floor to ceiling (or desired mounting point)
- Note any obstacles: Sprinkler heads, light fixtures, HVAC ducts, electrical conduits above the area
- Mounting surface
- Concrete ceiling: Good for ceiling-mount track (requires fasteners/anchors)
- Steel beams: Ideal for I-beam clamp systems (freestanding track)
- Drywall: Risky; requires solid wood backing or steel reinforcement
- Soffit/overhang: May limit track placement
- Flooring & drainage
- Is the floor level? (Use a level to check; slopes affect curtain hang and water flow)
- Are there existing drains? Where’s the natural water flow?
- Will 3-inch floor clearance (standard for curtains) interfere with floor equipment or drainage?
- Environmental factors
- Water temperature (cold water wash vs. hot water): Affects PVC flexibility
- Chemical exposure (soaps, degreasers, solvents): Standard PVC handles most car wash chemicals, but verify
- Ambient temperature: Extreme cold can make PVC stiffer; extreme heat can soften it
Red Flags:
- Uneven ceiling: If floor-to-ceiling height varies by more than 1 inch across the span, custom curtain design is needed.
- Corroded existing track: If you’re reusing old track, clean and inspect for rust/bearing damage.
- Soft mounting surface: Drywall ceilings won’t support track weight without backing.
Step 2: Choose Your Curtain Type
You have three main options for car wash/wash bay enclosures:
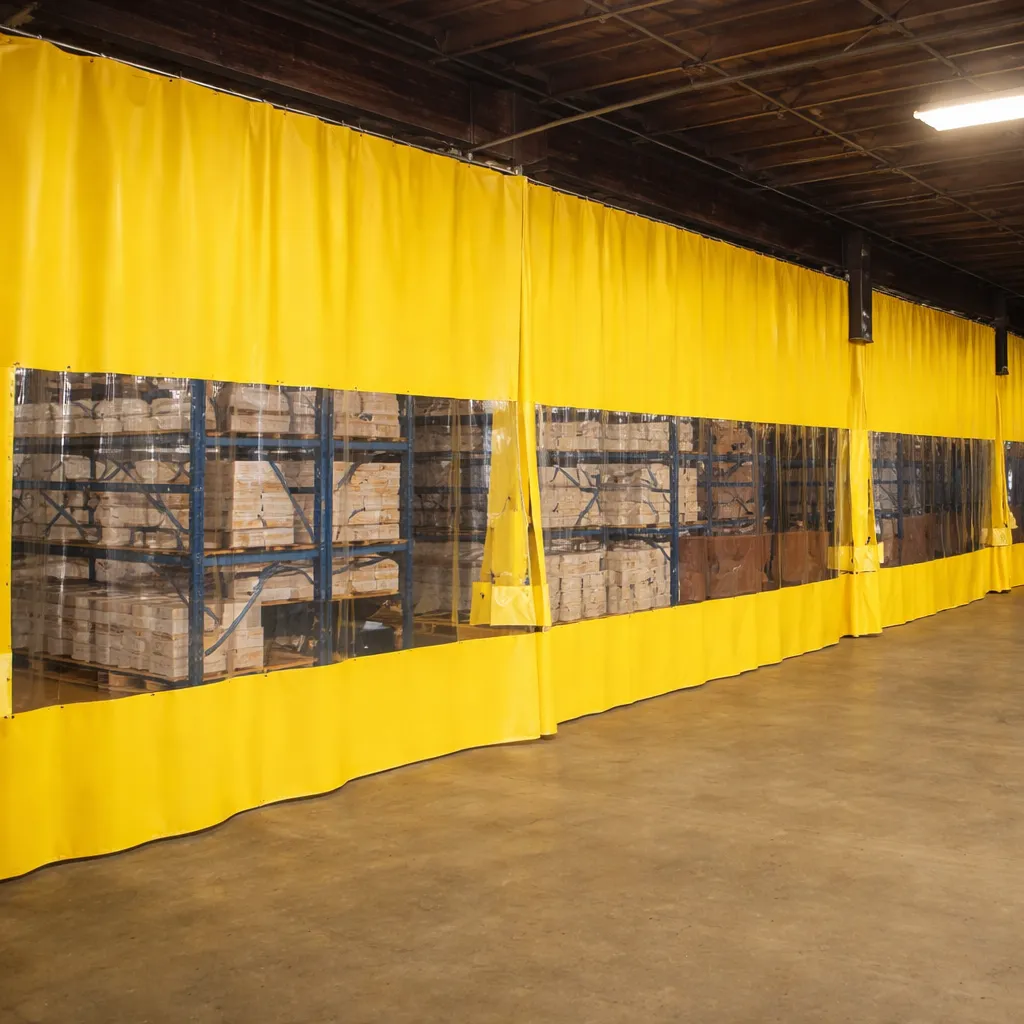
Option A: Full Floor-to-Ceiling Enclosure
- What it is: Curtains from floor to ceiling (or 1/4 inch below), creating a complete box
- Best for: Self-serve bays where you want maximum water containment
- Pros: Best splash containment, clearest visual separation, professional appearance
- Cons: Highest material cost, requires precise measurement
- Water containment: 95% (minimal overflow)
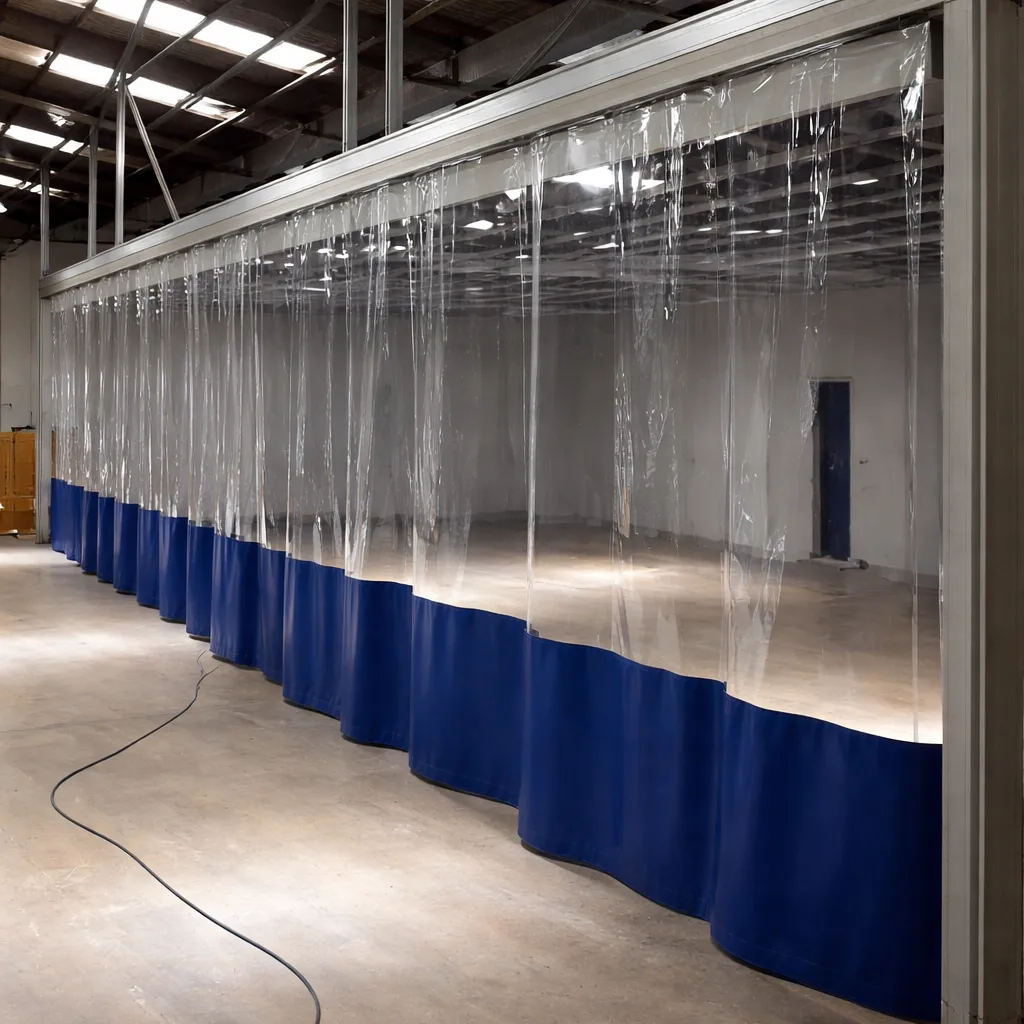
Option B: Partial Enclosure (Two or Three Sides)
- What it is: Curtains on 2–3 sides, with open side for vehicle entry/exit or equipment access
- Best for: Roll-through bays or large equipment wash areas where one side must remain open
- Pros: Lower material cost, easier installation, maintains visibility
- Cons: Water splash leaks through open side (acceptable if drainage system handles overflow)
- Water containment: 70–85%
Option C: Single Wall Divider
- What it is: One straight curtain system dividing the space (e.g., separating wash bay from adjacent work area)
- Best for: Separating functional zones; protecting adjacent operations from splash
- Pros: Lowest cost, easiest to install, most flexible for future changes
- Cons: No water containment; used for spray separation, not capture
- Water containment: Not applicable (spray control only)
Recommendation for car wash: Full enclosure (Option A) provides best protection and ROI over time.
Step 3: Measure for Curtain Sections
This is the step where precision prevents failures.
Measurements You Need:
- Width of opening
- Measure at top, middle, and bottom of opening
- Average the three measurements (this is your “true width”)
- Add 5% for curtain section overlap (curtain sections should overlap by 2–3 inches at junctions to prevent spray leakage)
- Example: 20 ft opening → 20 × 1.05 = 21 ft of curtain material
- Height of opening
- Measure from floor to track mount point (or ceiling)
- Subtract 3 inches for floor clearance (allows drainage, prevents water pooling)
- Example: Ceiling at 10 ft 2 in → 10 ft 2 in − 3 in = 9 ft 11 in
- Add 2 inches for sealing at top (curtains should overlap track mounting point by 1–2 in)
- Curtain section width preference
- Standard curtain sections: 48–60 inches wide (easier to handle, transport, and store)
- Wider curtain sections: 72+ inches (fewer seams, cleaner appearance, heavier to handle)
- For a 21 ft opening with 48″ curtain sections: 21 ft ÷ 4 ft = 5.25 curtain sections (order 6 to account for overlap)
Formula Reference:
Total Curtain Width = (Opening Width × 1.05) + 12 inches (for header overlap)
Curtain section height = (Floor-to-Ceiling Height − 3 inches clearance) + 2 inches overlap
Number of Curtain Sections = (Total Curtain Width in inches) ÷ (Curtain Section Width in inches)
Measurement Worksheet:
- [ ] Opening width at top: _____ ft/in
- [ ] Opening width at middle: _____ ft/in
- [ ] Opening width at bottom: _____ ft/in
- [ ] Average width: _____ ft (use this number)
- [ ] Floor-to-ceiling height: _____ ft/in
- [ ] Actual curtain section height needed: _____ ft/in (subtract 3″)
- [ ] Curtain section width preference: _____ in
- [ ] Number of curtain sections: _____
- [ ] Total linear feet of track: _____ ft

Step 4: Select Your Track System
The track system is the backbone of your installation. Choose based on your ceiling type.
Track Type 1: Ceiling-Mount Track (Galvanized Steel)
- Best for: Concrete or steel ceilings with direct overhead mounting available
- Installation: Fasten track directly to ceiling with toggle bolts, concrete anchors, or welding
- Load capacity: 150–200 lbs per linear foot (adequate for most car wash curtains)
- Budget level: medium (including fasteners and labor)
- Pros: Most common, reliable, affordable
- Cons: Requires drilling into ceiling; not adjustable after install
Track Type 2: Wall-Mount Track
- Best for: Concrete block or brick walls, when ceiling mounting isn’t possible
- Installation: Fasten track to wall studs or anchors; curtain sections hang vertically down walls
- Load capacity: Similar to ceiling-mount
- Budget level: medium
- Pros: Works in facilities with overhead obstacles or low ceilings
- Cons: Requires sturdy wall attachment; visual impact of side-mounted track
Track Type 3: Freestanding I-Beam Clamp System
- Best for: Steel structures, warehouses, or facilities where drilling ceiling is not permitted
- Installation: Clamps mount to existing I-beams without drilling; mobile and adjustable
- Load capacity: 200+ lbs per linear foot
- Budget level: medium
- Pros: No ceiling penetration, highly flexible, mobile, professional appearance
- Cons: Highest cost, requires proper I-beam spacing
Which Track for Your Car Wash?
For most car wash facilities with concrete ceilings: Ceiling-mount galvanized track is standard and cost-effective.
For roll-through bays where a freestanding system makes sense: I-beam clamp system offers flexibility for reconfiguring the wash bay layout.
Step 5: Install the Track
Track installation is mechanical and demands precision. Small errors cascade (binding curtain sections, uneven height, water leak patterns).
Installation Process:
A. Establish a Level Line
- Mark your mounting points using a chalk line or laser level
- For ceiling-mount: Draw a straight line across ceiling at your chosen mounting height
- For wall-mount: Draw a vertical line down the wall where the track will attach
- Check with a level—even 1/4 inch of tilt will cause curtain sections to bind
B. Space Your Fasteners Correctly
- Concrete ceiling: 16–24 inch spacing for toggle bolts or concrete anchors
- Steel beam: 12–16 inch spacing for clamps
- Fasten at both ends first, then work toward the middle
C. Install Fastener Type Based on Surface
Into concrete:
- Concrete anchors (expansion plugs): Drill pilot hole, tap in anchor, thread bolt through track
- Stud anchors (for thinner concrete): Similar to expansion anchors but wider load distribution
- Fastener spacing: 16–24 inches apart
Into steel:
- Beam clamps: Tighten clamp around beam; bolt track through clamp
- Welding (permanent install): Have a certified welder attach track brackets permanently
- Fastener spacing: 12–16 inches apart
Into wood (not ideal, but possible):
- Wood lag bolts or through-bolts with large washers
- Mount into solid wood framing, not drywall
- Fastener spacing: 16 inches maximum
D. Verify Track Alignment
Once fastened, verify with a level:
- [ ] Track is level (no tilt left-to-right)
- [ ] Track is square to opening (measure diagonals—they should be equal)
- [ ] Track doesn’t sag in the middle (check with straightedge)
- [ ] Fasteners are tight (try to wiggle track; should not move)
Tools You’ll Need:
- Drill with appropriate bits (concrete bit, metal bit)
- Level (2–4 ft minimum for accuracy)
- Tape measure
- Chalk line or laser level
- Socket wrench or adjustable wrench (for bolts)
- Ladder or lift (depending on ceiling height)
Step 6: Hang Curtain Sections
With track installed, hanging curtain sections is the next step.
How Curtain Sections Attach to Track:
- Carrier hooks (most common): Small brackets that roll inside the track channel; curtain sections hook into carriers
- Curtain Section suspension system varies by manufacturer—ask your supplier for their method
Hanging Process:
- Start at one end of the track and work toward the other
- Insert first carrier hook into the track channel, slide to the starting point
- Attach curtain section by connecting the curtain section’s top header to the carrier (typical methods: bolts, rivets, or pin fasteners—confirm with your supplier)
- Slide curtain section across track slowly to ensure smooth operation
- Install next curtain section with slight overlap (2–3 inches) to the previous one
- Secure overlap with snap clips or velcro (prevents curtain sections from separating)
- Test slide each curtain section after installation—it should glide smoothly without binding
Curtain Section Spacing Tips:
- Overlap: 2–3 inches at curtain section junctions (keeps water from spraying through gaps)
- Lead curtain section: The first moving curtain section should have a guide rail or bumper to stop it from sliding off the track
- Trailing curtain section: The last curtain section can be fixed (non-sliding) to save wear on carriers
Step 7: Test & Adjust (Slide Test, Drainage Check, Fine-Tuning)
Before putting the bay into service, test everything.
Test Checklist:
- [ ] Slide test: Manually slide each curtain section back and forth 5–10 times. Check for:
- Smooth, effortless movement
- No binding or sticking
- No noise (squeaks or grinding indicate bearing issues)
- [ ] Overlap alignment: With curtain sections closed, check:
- 2–3 inch overlap at all junctions
- No gaps visible (especially at top and sides)
- Water won’t spray through gaps
- [ ] Floor clearance: Check:
- 3-inch clearance from floor is maintained
- No dragging or snagging on floor
- [ ] Drainage: Do a water test:
- Spray water lightly inside the enclosure while curtain sections are closed
- Water should pool slightly then drain out the gaps/drain system (not escape sideways through curtain section junctions)
- [ ] Carrier alignment: Open and close curtain sections multiple times to ensure:
- Curtain sections do not derail
- Carriers ride smoothly in the track
- End stops prevent over-extension
Adjustments:
- Curtain Section binding: If a curtain section drags or binds, the track may not be perfectly level. Loosen fasteners on one end and shim the track slightly (use metal shims under the fastener) to correct tilt.
- Water leaking through overlaps: Tighten the overlap (reduce gap from 3 inches to 2 inches) or add velcro strips to seal the junction.
- Curtain sections not sliding smoothly: Check for:
- Dirt or debris in the track channel (vacuum or wipe clean)
- Frozen/rusted carriers (spray with WD-40 or silicone lubricant)
- Track misalignment (verify level again)
Tools & Materials Checklist
Required Tools:
- Hammer drill (concrete) or standard drill (steel)
- 6–8 ft ladder or lift
- Level (4 ft minimum)
- Tape measure
- Socket wrench set
- Adjustable wrench or crescent wrench
- Putty knife or flat pry bar (for shims)
- Flashlight (for checking fastener tightness)
Materials You’ll Need:
- Fasteners (concrete anchors, bolts, washers—see your supplier specs)
- Track mounting brackets (if not included with track)
- Shims (metal or plastic, for leveling)
- Velcro or curtain section clips (for sealing overlaps)
- Lubricant (silicone-based, for smooth curtain section operation)
Common Installation Mistakes (And How to Avoid Them)
Mistake 1: Not Measuring for Overlap
What happens: Curtain sections do not overlap enough; water sprays through gaps; curtain looks sloppy. Fix: Always add 5% to your opening width and ensure 2–3 inch overlap at every junction.
Mistake 2: Installing Unlevel Track
What happens: Curtain sections slide toward low end; some curtain sections bind; water pools unevenly. Fix: Use a 4 ft level before fastening. Check at multiple points along the track.
Mistake 3: Fastening to Drywall Only
What happens: Track pulls out; curtains fall; liability risk. Fix: Always fasten to concrete, steel, or solid wood backing. Never rely on drywall anchors alone.
Mistake 4: Ignoring Floor Clearance
What happens: Curtain sections catch on floor debris, water pools under curtain sections, hygiene issues. Fix: Maintain 3 inch clearance. Measure twice before hanging.
Mistake 5: Spacing Fasteners Too Far Apart
What happens: Track sags in the middle; curtain sections don’t slide smoothly; water leaks under the sag. Fix: Follow manufacturer spacing (typically 16–24 inches for ceiling-mount).
Mistake 6: Not Testing Before Full Use
What happens: First wash reveals binding, water leaks, or misalignment that’s expensive to fix. Fix: Do a full water test with curtain sections open and closed before putting the bay into service.
Mistake 7: Choosing the Wrong Track Type
What happens: Track system inadequate for load or ceiling type; requires costly replacement. Fix: Assess your ceiling type (concrete, steel, drywall) and ask your supplier to recommend the track system.
When to Hire a Professional vs. DIY
DIY If You:
- Have building/construction experience
- Are comfortable with power tools and ladder work
- Have access to proper tools (drill, level, fasteners)
- Are installing a simple, straight track (not complex angles or multiple angles)
- Have 3–5 hours available for a typical single-bay installation
Hire a Professional If You:
- Lack construction experience
- The ceiling/walls are difficult or unusual (curved, uneven, metal framing)
- You’re installing a multi-section enclosure (L-shaped, U-shaped, full facility)
- You need warranty/guarantee on the installation
- You prefer to avoid downtime risk (professional can often complete in 1 day)
Professional installation cost: Budget $$ to $$$ in labor (varies by complexity and region).
Manufacturer Insight: Installation Issues We See Most Often
From 13+ years supplying car wash curtains, here are the issues that come back to installation:
- Fastener failure in the first 6 months — Usually because fasteners were undersized or spaced too far apart. Over-specification (heavier fasteners, closer spacing) pays off.
- Curtain sections binding after 2–3 months — Concrete dust in the track channel from the installation process. We now recommend vacuuming the track thoroughly after fastening and before hanging curtain sections.
- Water leaking through overlaps — Usually because the original overlap was only 1 inch. We now specify 2–3 inches minimum, and we provide velcro strips with every order.
- Track misalignment due to uneven concrete — Many car wash bays have sloped concrete (for drainage). The track must be leveled relative to the room, not the sloped floor. This requires shims—and many installers miss it.
- Carrier failure after 12 months — Often caused by rough curtain sections (burrs from cutting or poor handling). We now inspect every curtain section for rough edges before shipping and recommend the installer do a final visual inspection before hanging.
FAQ
Q: Can I install a curtain system over an existing track system? A: Sometimes. If the existing track is level, securely fastened, and appropriate for your curtain sections, you can reuse it. But inspect it thoroughly first—rust, bent sections, or misaligned fasteners will cause problems.
Q: How long does a typical installation take? A: A single-bay enclosure: 3–5 hours for an experienced person. Multi-section or complex layouts: 1–2 days. Professional installers often complete in 4–8 hours.
Q: Do you provide installation service? A: We’re a manufacturer based in China, so on-site installation isn’t available. But we provide detailed installation guides, videos, and phone support to help your local contractor or team.
Q: What if my ceiling has an unusual shape or obstacles? A: Contact us with photos and measurements. We can recommend custom track layouts or alternative fastening methods for unusual configurations.
Ready to Install Your Car Wash Curtain System?
Don’t let installation challenges slow you down. We’ll provide detailed specs, installation guides, and technical support.
Request a Quote for Your Car Wash Project →
Questions about your specific installation? Our engineering team can review your layout and recommend the best approach.
Related Reading
- Industrial PVC Curtains for Car Wash & Industrial Use
- How to Measure for Industrial Curtains (+ Calculator)
- Industrial Curtain Track Systems: Types & Installation
- Wash Bay Curtain Maintenance: Complete Care Guide
Ready to get started? Request a Custom Quote or Browse Our Curtain Products on Alibaba.
Author: SKP Material Engineering Team Published: April 2026 Topics: Car Wash Curtains, Installation Guide, Wash Bay Setup